start
The PKHATCH series of commands help centralize FastCAD’s hatching capabilities. The PK Data Hatch dialog box pops up to help manage hatching and offers a Simple Line hatch capability that can be transfered more readily to DXF/DWG exported files.
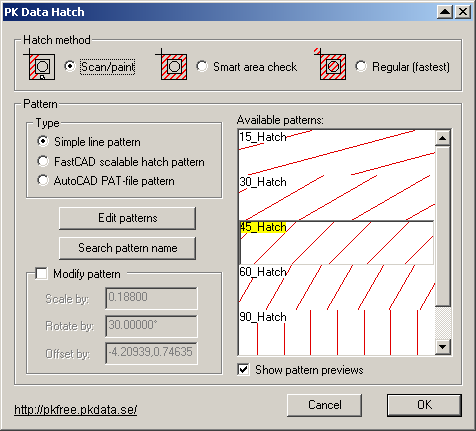
The first time that PKHATCH is run, line hatch patterns should be created by clicking the Edit Patterns button. It is best to create a small series of patterns. These Hatch Patterns are saved to the registry and will be available as choices in future drawings. PKHATCH allows a lot of versatility in the use of patterns by scaling the patterns for the variability needed to effectively adjust to paper space – when printing and exporting CAD files. It is suggested that a small collection of patterns be created, such as 15, 30, 45, 60 and 90 degrees. From the Modify Pattern section, users can take an existing line hatch pattern and paper scale it, as well as change its rotation. Therefore it is advisable to start out creating patterns with a 1.00 unit Distance. Below is an example of a generic 45 degree by 1.00 unit spacing pattern.
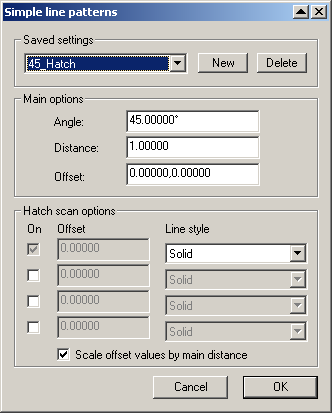
When inserting such a pattern into a drawing which prints out on paper, the user may “Modify the Pattern” by scaling it with, as an example, the same value as the Text Height used on the printed page. Therefore, if the Text Height is set to 1/8”, type .125 into the “Scale by” field and click the OK button. Follow the command line prompts to pick entities and to complete the chosen hatch method.
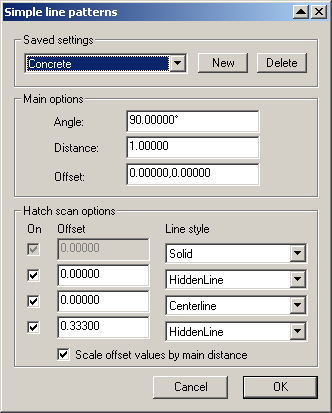
You can also modify the pattern’s rotation just prior to inserting the hatch. The benefit of this capability is that the Template file can be setup with a series of alternating line style hatch patterns. All the patterns can be created using the 1.00 Distance and a 90 degree Rotation, yet when inserted into a drawing, the user can “Modify the Pattern” to adjust it to particular drawing circumstances. As an example, hatch patterns can be named Steel, Aluminum, Brass, Plastic, Concrete, etc. Below is an example of using multiple line styles within the line pattern editor to create a hatch representing Concrete.
After the patterns have been set up and chosen, the PKHATCH command executes filling the hatch in either the Scan/Paint, Smart Area, or Regular methods.
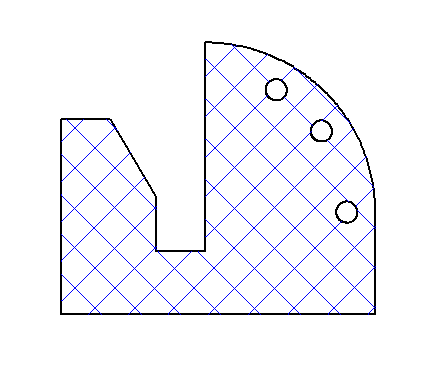
After the user clicks OK to close the dialog box, PKHATCH prompts for selecting the bounding entities for the hatch. After selecting, the command prompt indicates, “Drag over area to hatch.” Drag the mouse (with left button held down) to scan through the area requiring the hatch pattern. By holding down the shift key while scanning, PKHATCH will begin painting a cross hatch pattern. Any lines that look out of place can be removed by scanning over them with the Control key depressed. After the hatch looks satisfactory, right click the mouse to accept and terminate the command.
When picking Smart Area hatch, the first command line prompt asks for selecting the bounding entities. The second prompt tells the user to pick a point inside the area which requires hatching. PKHATCH calculates the necessary line hatching and places in the lines. This method of insertion is best used with very large and complicated surfaces that need hatching. No other features are available, cross hatching requires re-running the command again with an altered rotation.
When picking Regular hatch, the first and only command line prompt asks for selecting the bounding entities. When these are accepted with a “Do It,” the line hatches appear inside the bounds. This works on fully enclosed simple areas and is the fastest of the three ways to hatch a surface.
To call this command, you can type PKHATCH at the command line. However, the most productive way to use PK Data commands is to integrate them into the Menu and Icon Bar, so that they can be called efficiently when you are drawing.
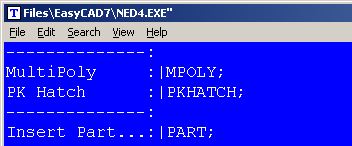
Before editing your menu, it is recommended that you backup the menu file. It can be found in the root directory of FastCAD or EasyCAD and is called FCW7.MNU or ECW7.MNU respectively. The backup file can come in handy if things do not work well after editing, you can always return to the original factory menu. In the CAD program’s root directory, you can find and launch NED4.EXE. FastCAD provides this as a text editor for making such customized changes. Use File > Open... to begin editing FCW7.MNU or ECW7.MNU. Scroll down to the bottom of the Draw menu area and change the commands just under MultiPoly, to read as follows:
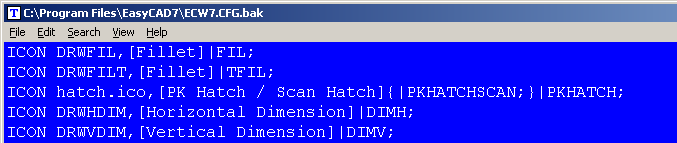
Before editing your Icon bar configuration, it is recommended that you backup the configuration file. It can be found in the root directory of FastCAD or EasyCAD and is called FCW7.CFG or ECW7.CFG respectively. The backup file can come in handy if things do not work well after editing, you can always return to the original factory configuration. In the CAD program’s root directory, you can find and launch NED4.EXE. FastCAD provides this as a text editor for making such customized changes. Use File > Open... to begin editing FCW7.CFG or ECW7.CFG. FastCAD and EasyCAD do not have an icon for any of the Measurement commands. The following example shows an approach for adding such an icon, however it will require drawing artwork to represent the icon and naming the file: hatch.ico. The example below codes one of PK Hatch’s related macro commands, PKHATCHSCAN as the Left-Click icon pick (refer to the macro section below). PKHATCH is coded as the Right-Click pick. Both commands are designed to complement each other, by right-clicking, the user can continue Scan Hatching additional selections without bringing up the dialog box.
Download zip file with PK Free Icon artwork. Extract directly into FastCAD or EasyCAD v7 program root directory.
If you prefer to have separate icons for PKHATCH and PKHATCHSCAN, consult the FastCAD Help files to learn how to add custom icon artwork and the command code to your configuration. If you need support, consult the Evolution Computing community’s bulletin board at the link below. The community is always open to helping users who are learning to customize the look and feel of their CAD software.
http://fastcad.com/ubb/ultimatebb.php
For those users that modify their Menus or Icon Bars, several macro commands are available to bypass the PK Hatch dialog box. PKHATCHSCAN, PKHATCHSMART, and PKHATCHREGULAR are used to run the respective commands using previous settings, without showing the dialog box. Many additional macro commands are available to setup individual PKHATCH settings. These can be used to create macros which can line hatch complex drawings in automatic scripts. Most of these commands update several option values directly from the command line prompts. The prompts will guide users thru the available options. The list of additional macro commands are:
Repeats the last used PKHATCH command and bypasses the dialog